Device Options


Device Options |
|
|
Device Options Rename Device Element
Add Elements To add an element to a device:
Tip: If the existing elements in a device are numbers, then elements you add to the device will also be numbers. For example, if you label the first two elements 1 and 2, the next element you add will automatically be labeled 3, the next one 4, and so on. If the current elements are labeled a, b, and c, then the next element added will be d. Note: The curve device does not have an add/subtract element button since it is not made up of discrete elements but of a continuum of values. Add Range of Elements To quickly fill a device with a range of elements (for example the numbers 1 to 100 or the letters a to z):
Copy and Paste from an Existing File To file a device with values from another source:
Delete Elements To delete the last element added:
To delete a particular or multiple elements:
Delete Device To remove the rightmost devices in a sampler,
To remove the last device added,
To remove a particular device,
Note: You cannot remove the device if there is only one in the sampler. Change Device Type You can drag into the sampler six different devices located on the bottom panel of the sampler. These include a mixer, stacks, spinner, distribution bar graph, distribution curve, and counter. To change the device type:
Display Count in Mixer and Stacks
Display Proportions or Percents in Bars and Spinners
Note: Spinner slices are computed to a very high precision. The proportion shows only four decimal places. The percent display rounds to the nearest whole number. Thus the size of three sections of a spinner divided evenly into thirds will appear as 0.3333 with Show Proportion and 33% with Show Percent. Change Size of Spinner Sections By dragging spinner sections:
Note: The precision of a slice is limited by the precision of the mouse. Increasing the sampler’s size will increase this precision. By editing percentage/proportion:
Change Height of Bars and Stacks By dragging bars or stacks:
Note: To quickly adjust the heights of all the bars, position the cursor at the top of one bar. When the cursor changes to a plus sign, click and drag across all the bars. By editing percentage/proportion of bars:
Change Shape in Curve Device
Sample without Replacement in Mixer and Stacks In mixer and stacks devices, you can sample with (default) or without replacement. To switch to Without Replacement:
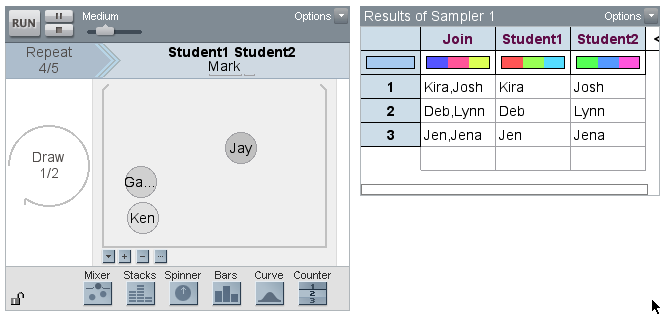
When set to sample Without Replacement, the top of the device will be open, to imply that elements exit from the top of the device once they are selected. In some situations, there are two types of Without Replacement options that you can select in the device menu: Replace after Each Repeat, and Replace After Last Repeat. If the Draw number is 1, then elements are replaced after the last Repeat— that is, after the sampler has completed drawing the number of samples you specified in the Repeat field. But if Draw number is 2 or more, you can choose to replace either after each case has been drawn, or after the entire run is completed. Here is an example of when you might want the latter option. We filled the mixer below with the names of 10 students, set Draw number to 2 and Repeat number to 5. Our objective was to pair all the students up randomly to work in groups. We've paused the animation partway through drawing the sample. The replacement option has been set to Replace After Last Repeat so that we don't add names back into the Mixer until the entire run has been completed.
Merge Two Devices To join together two branched devices in the same column:
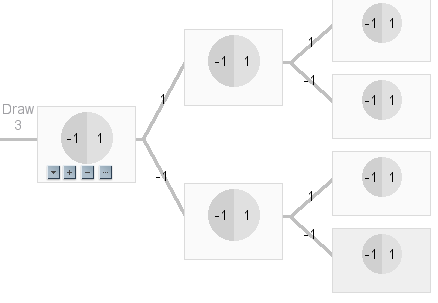
In either case, the device above will replace the device below. This sampler was built to model randomly moving three steps along a line, and at each step either going forward (+1) or backward (–1).
Because you would be at the same location after going +1 then –1, or –1 then +1, it would be conceptually clearer if the spinners associated with those two states were combined into one. The sampler below show the results after merging the two middle spinners in the third column.
Hiding Device Contents To hide the contents of a device:
To show the hidden contents of a device:
|