|

Basic Sampler Controls
Set Repeat Number
1.
|
Click the current number below "Repeat" and enter a new number of outcomes to collect.
|
Set Draw Number
1.
|
Click the current number below "Draw" and enter a new number of draws per outcome.
|
Specify a Condition to Run Until
Rather than sample a fixed number of times, it is also possible to continue drawing samples until a desired outcome occurs. To do this,
1.
|
Choose Sampler Options from the sampler's Options menu at the upper right of the sampler. Specify either a specific outcome to run until (pattern match), or a condition to satisfy.
|
Example 1: Below is a sampler designed to estimate the probability when flipping a coin three times of getting the outcome h,h,t by seeing how many repeats, on average, it takes to get that outcome. In the Sampler Options panel, we have selected the option "Repeat Until Pattern Matched," and then entered the outcome "h,h,t." In this instance, it took 16 repeats to get that outcome.
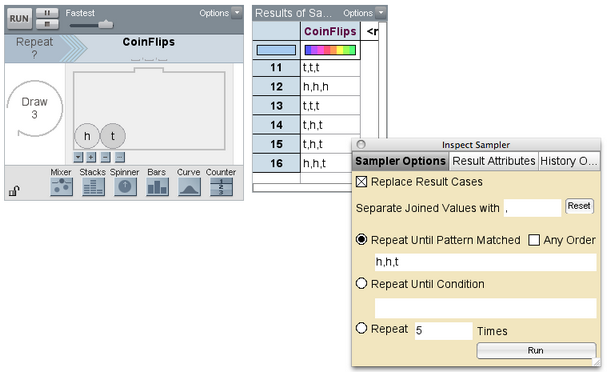
Had we checked the box "Any Order," then it would run until we got two h's and one t, regardless of their order of occurrence. Had we specified the outcome as "h,h,*", it would have run until we got heads on the first two flips, regardless of what happened on the third flip. (* is a wild card.) Had we specified the outcome "V1,V1,V2", it would have run until we got either "h,h,t" or "t,t,h."
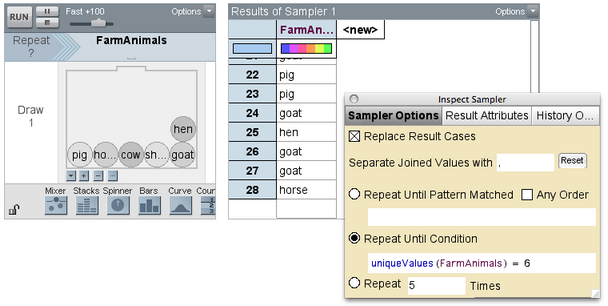
Example 2: Below is a sampler designed to estimate the problem of how long it would take to collect all six prizes that come in a box of a certain brand of cereal. Here these prizes are six different animals. In the Sampler Options panel, we have selected "Repeat Until Condition" and entered a formula that tells the sampler to run until the number of unique values of the attribute FarmAnimals is 6. On this particular run, that required 28 repeats.
Set Run Speed
1.
|
Drag the thumb of the Run Speed slider to the desired sampling speed.
|
Note: You can adjust the run speed even while the sampler is in operation.
Rename an Attribute
As elements are sampled, their values rise up into the slots beneath attribute names along the top of the sampler. These names initially appear as Attr1, Attr2, and so on. To change an attribute name,
1.
|
Click on the current name in the sampler, results table, or plot and edit it.
|
The name will be changed in all the other objects.
Start Sampling
1.
|
Click the RUN button to begin collecting data. A results table will automatically open, and each repetition will appear as a case in that table.
|
Pause Sampler
1.
|
Click the Pause button or press the Esc key to stop collecting data before the specified number of repetitions is completed.
|
2.
|
To continue collecting data without starting over, click the RUN button.
|
To end the collection process, click the Stop button. Existing results will not be deleted.
Draw a New Sample
1.
|
Click the RUN button. The results table and plot (if there is one) will update to show the result of the new sample.
|
Add Results to Current Collection
Ordinarily, when you run a sampler, any results currently in the results table will be deleted and replaced; new results replace old results. But sometimes you want to keep the existing data and have the new results added to them.
To add data to an existing collection rather than replace that data,
1.
|
From the sampler's Options menu, choose Sampler Options.
|
2.
|
In the panel, uncheck "Replace Result Cases."
|
Results from a previous run will be kept and results from future runs added to them.
Send Results to a New Collection
To keep the last results from a sampler and send future results to a new collection:
1.
|
Select the results table by clicking on it.
|
2.
|
Choose Object | Duplicate Case Table.
|
This will create a new results table with a different name. Now when you click RUN in the sampler, all new results will be added to your original results table, and the new table will remain unchanged.
Lock the Sampler
Lock the sampler to keep students from changing any of its settings or to prevent them from prematurely revealing the contents of hidden devices.
To lock a sampler:
1.
|
Click the lock icon located at the bottom left of the sampler.
|
2.
|
Enter a password if desired, or just click OK. The later will allow anyone to unlock the sampler just by clicking the lock icon.
|
Note: When the sampler is locked, its settings cannot be changed; it can only be run. Locking the sampler also removes the device icons from the lower panel of the sampler.
To unlock a sampler:
1.
|
Click the lock icon.
|
2.
|
If the sampler is password-protected, a password will be requested.
|
TinkerPlots Help
© 2012 Clifford Konold and Craig D. Miller
|
| 

